EDIT: For the people who enjoy the “TedTalk” video version of these guides, i added the video at the bottom of the page, enjoy! ![]()
New video at the bottom of the page showing you how to add Controller Support to this kind of movement and animations! Hope you enjoy! ![]()
Hello there! ![]()
If your reading this, its probably because you tried animating your top down character thinking it was gonna be easy… only to end up scratching your head while starring at the screen… don’t worry, thats normal ![]()
Giving your top down character animations and make them work is simple stuff… the issue is making it work properly, without bugs, giving your player full control over the characters facing direction.and adding in all the extras, like playing sounds while you move or dust particle effects for your steps.
…again… don’t worry, im not just making this post to tell you how hard this stuff can be, im also gonna show you how to program it properly in your game!
Lets go! ![]()
One of the best Top Down movements, the “Link to the Past”.
So… the movement we are gonna use is the same used in Legend of Zelda: Link to the Past.
What that means is…
-
If we have the “Left” button pressed, the character will move and face towards the left while using the “Running Left” animation.
-
While we have the “Left” key pressed, if we press the “Up” or “Down” key, the character wont change animation or face somewhere else, he will simply move up or down diagonally, while keeping the “Running Left” animation.
-
Letting go of the initial button, in this case “Left”, makes the character go “Idle”, or if another direction is pressed, lets say “Up”, it will transition to the “Running Up” animation and start moving and facing upward.
-
While holding the “Up” key, if we press either “Left” or “Right” key, we will have the same effect as before, we will keep the same animation and facing direction, we will simply move diagonally towards either the left or right.
…and with that out of the way… lets get to programming!!
First step.
-
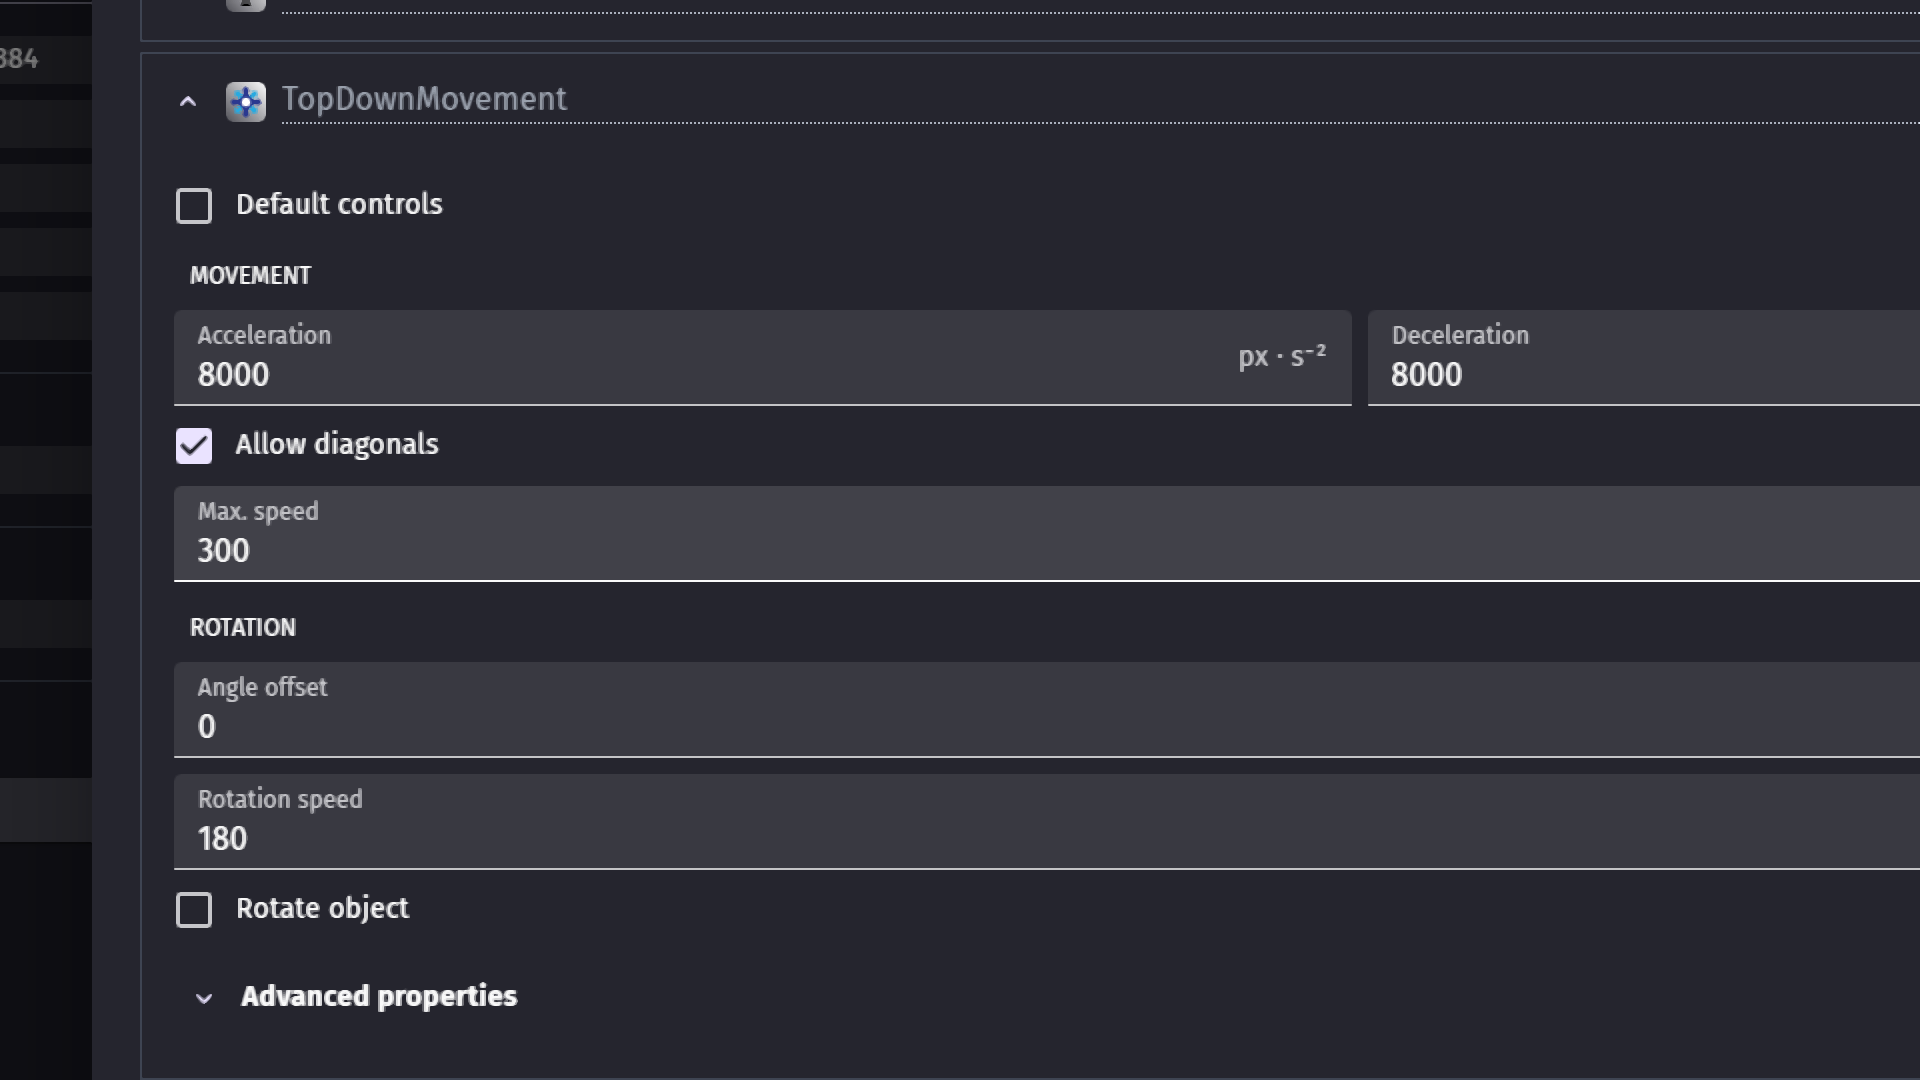
Create your “Player” object and then give it the "Top-down movement (4 or 8 directions) Behavior.
-
The Top-down movement behavior is where we set our character movement speed, everything else outside of this, is all going to be for setting up our animations. Adding movement and adding animations are two different things, separate them and youll make your life much easier.
-
First check “off” the box that says “Default controls.” (Its always nicer to add controls as events, in case we want to put any extra conditions or actions on them).
-
Now lets change the “Acceleration” and “Deceleration” to “8000”, or any high number like that. This makes our character movement quick and snappy, stopping it from ramping up speed like a car, and slowing down to a stop like one too.
-
Next, check “off” the box that says “Rotate object”… again… we are not a car

-
And lastly, while your on the Behaviors tab, if you want the full “Link to the Past” with the camera following you, add the “Smooth Camera” Behavior. No need to change anything on this one, leave it default.
Second step.
Lets import our animations!
For a top down character we will need 2 sets of 3 animations each, one set for “Idle” and one set for “Moving”.
Idle Animations
- Idle facing to the right.
- Idle facing up.
- Idle facing down.
- You can loop these animations.
Movement Animations
- Moving facing right.
- Moving facing up.
- Moving facing down.
- DO NOT LOOP The moving animations.
IMPORTANT!
The “Moving” animations must all have the same number of frames.
For example, if “Moving Right” has 4 Frames, then “Moving Up” and “Moving Down” must also have 4 Frames each. The reason for this is to make the added extras, like sounds and particles, be smooth and even, giving it a very polished feel.
Finally step three! Lets program!
With our character set up with animations and behaviors, its time to start the real hard work and get to programming!
Easy mode first… lets add in the character controls.

-
This one is pretty easy to understand, simply make an event group, call it something like “Character Controls”. then copy the image above.
-
“Rogue” is my player character, change that for your own “Player” object.
-
Ignore the conditions where im checking if a “SwordAttack” object exists on the scene. The reason i have it there, is because i dont want my character to be able to move while he attacks. Feel free to adapt this to your own game if you want the same effect.
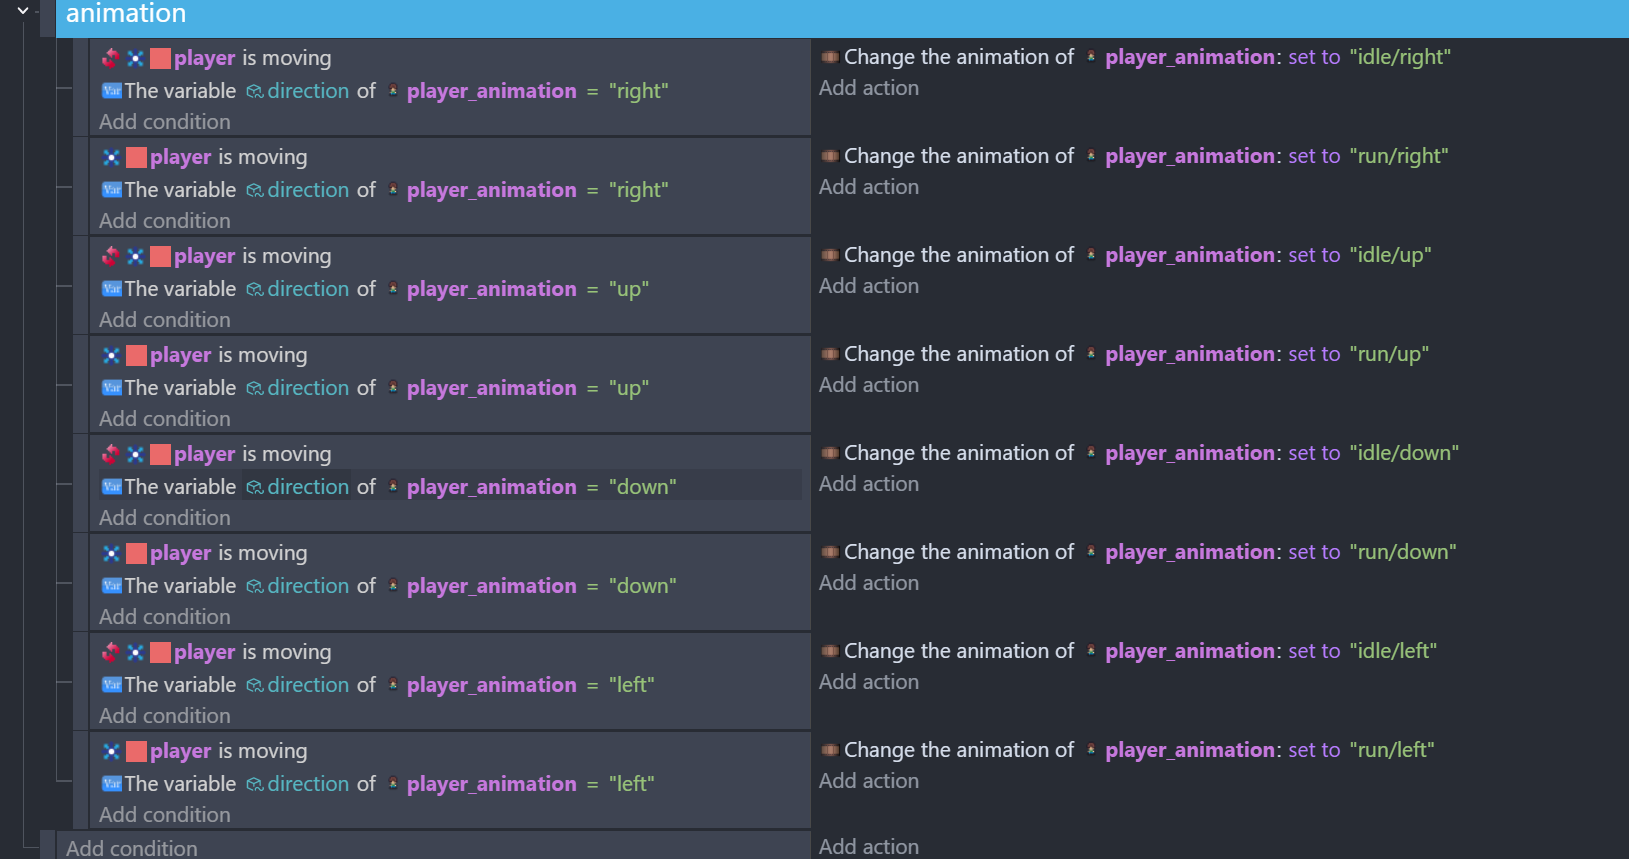
That was just a tiny warm up… now to the deep end! Creating “States” for our animations!
Top half

Bottom half
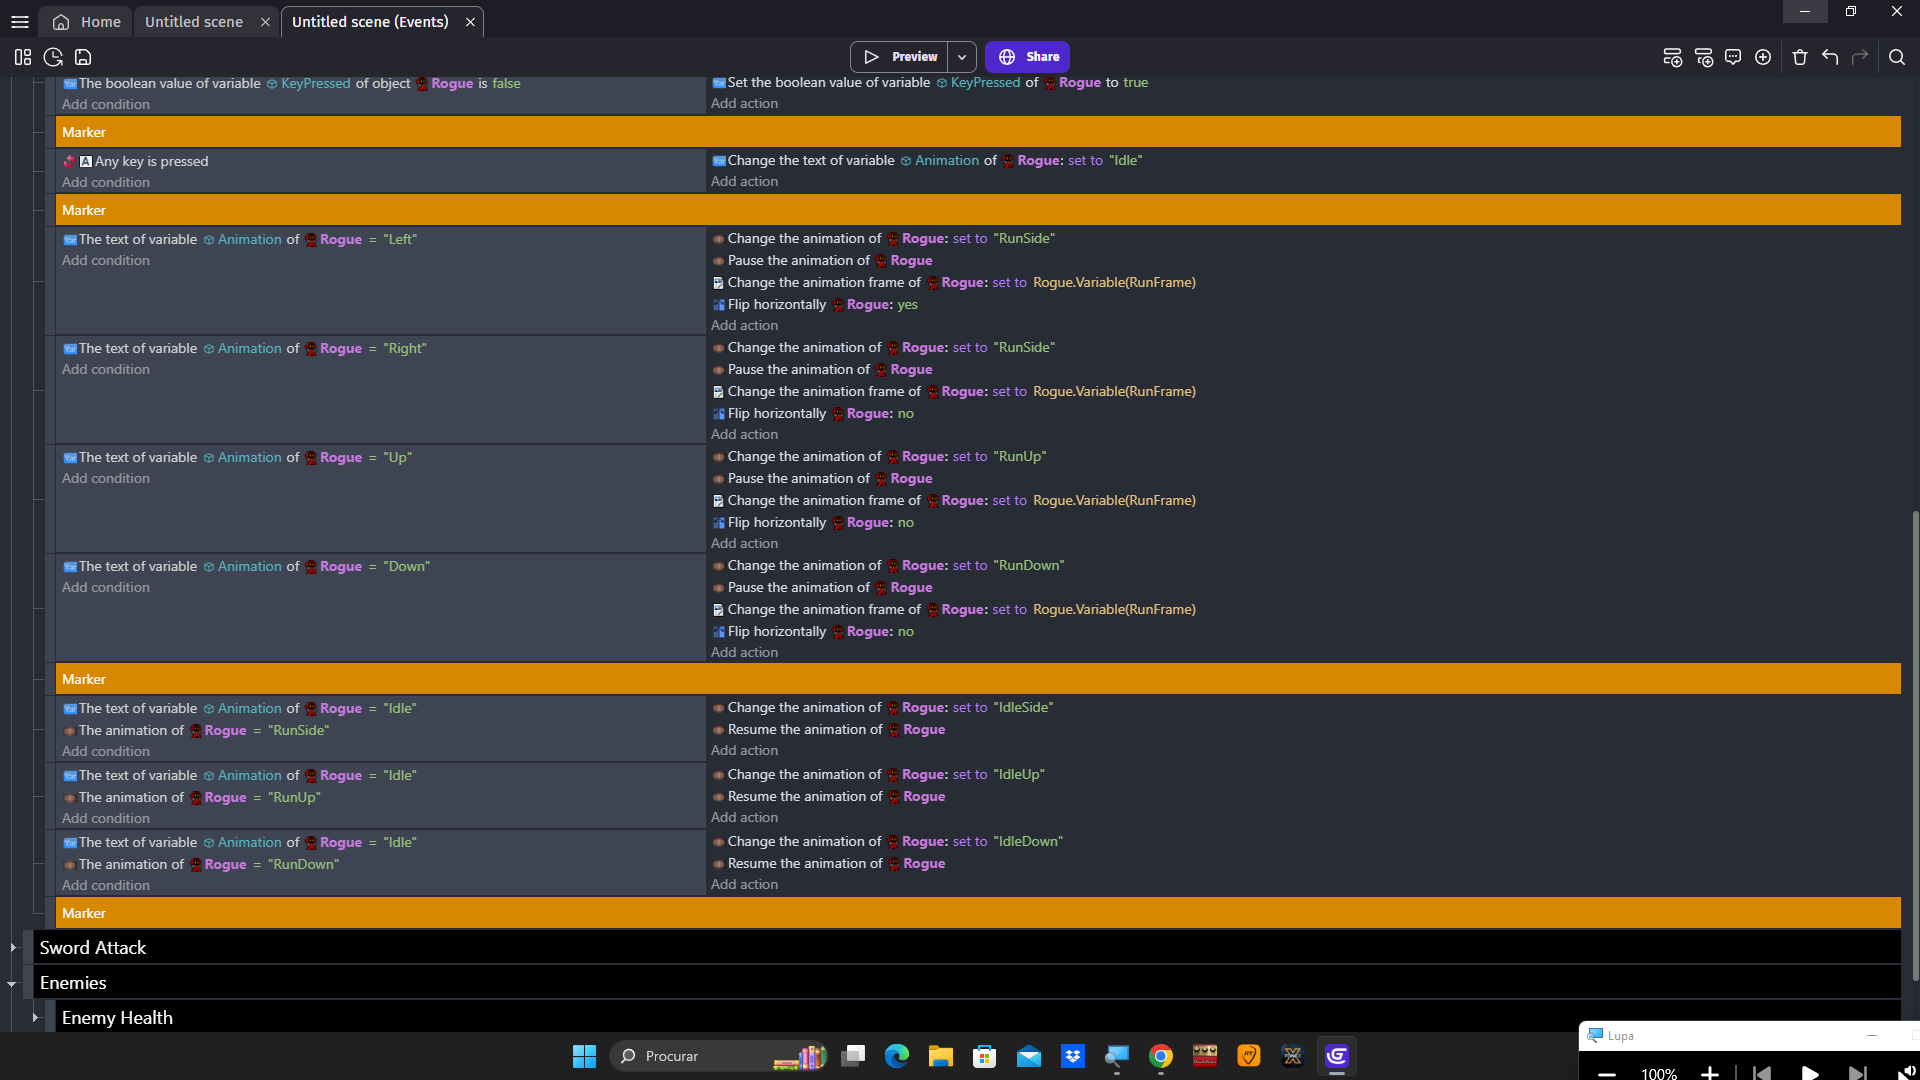
If none of this makes sense, just copy it, youll be fine… but heres whats going on…
-
What we are doing is creating “States” for our character, so for example, when we press and hold the “Left” key, we set the characters “State” as “Left”.
-
We do this by changing an “Object Text Variable” that i called “Animation” to “Left”, and then we use that variable to make specific actions happen, like changing the animation to “RunLeft”.
-
The most important part is that for as long as we are holding down the “Left” key, we can press other directions that the animation wont change, because the “State” only ends when the first key we pressed is released, that is seen at the top of the events.
-
The other important thing we are doing, is setting up our animations to be synchronized. By pausing the “moving” animations the moment we change to them. This makes us able to manually set their frames with a timer. This part will make more sense in the next section.
-
If no key is being pressed, we check winch way we are facing, and set the “Idle” animation accordingly.
Ok, so hopefully some of that made sense… now we can change between our animations, but the moving animations are all paused… lets make them move!
Synchronizing the moving animations!
The reason we are going to synchronize the moving animations is so that when the player is rotating around, changing rapidly between all the states, we dont get “not so pleasing” behaviors, like sounds repeating too quickly, steps not sounding even when changing animations, dust particles quickly repeating… all the stuff that makes a game feel amature.
By synchronizing our moving animations, we make everything smooth, even and Triple A game polished.
Heres how we do it!
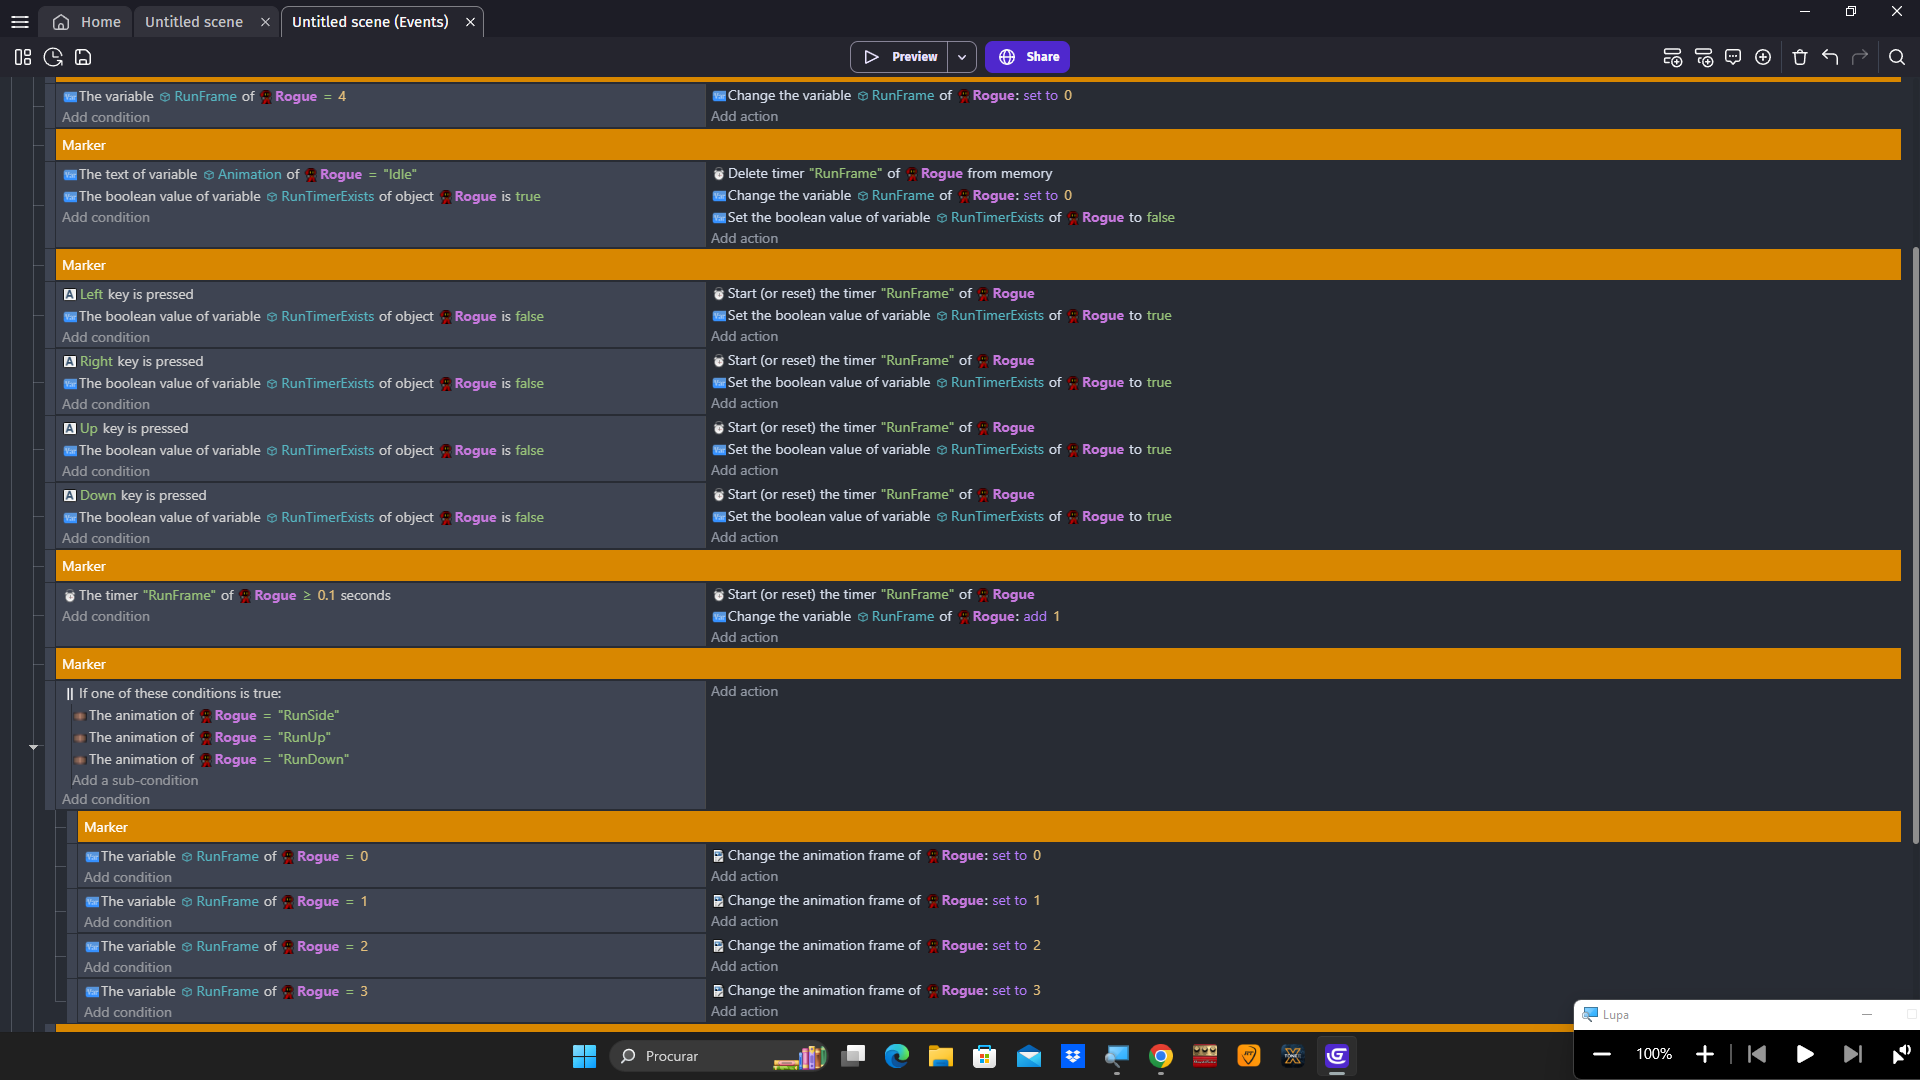
Take your time and study this section. The whole thing sounds way more complicated than it actually is.
Essentially what we are doing is…
-
When press a key to start moving, we also start a time.
-
When the timer reaches a certain value, in this case “0.1 seconds”, we add a value of “1” to a “Object Number Variable”.
-
This variable determines which frame our animations will change to.
-
Since my animations have 4 Frames, and animations start at Frame #0, meaning the frames are 0, 1, 2 and 3, when the variable reaches the value of “4” i set it back to “0”, this can be seen at the very top of the events.
-
The moment we stop moving and our character goes “Idle” we stop and delete the timer.
-
In the event where we add “1” to the variable “RunFrame”, the “Value” of the timer, in this case “0,1 seconds” , is what determines the speed of your moving animations.
Lastly heres a couple of Extras!
This is how i add sounds and particles to my characters steps.

This should be easy stuff, just copy the events and youll be fine ![]()
…and the final extra, is how i make my character Dash! Its not perfected yet, but it works just fine ![]()

Is only a 4 Way Dash, but you can modify it for 8 Ways.
…and that was it!!!
If the events dont make much sense to you at first glance, take your timer, study them try applying them and slowly it will make more sense to you! ![]()
If theres a section youd like help with, let me know and ill try to explain it better for you!
Till then, i hope you like my guide and that it was able to help you in some way!! ![]()
Video explanation
 How to Properly do Top Down Movement and Animation (SNES Legend of Zelda Style)")
Adding in Controller Support

YouTube Channel