I’ve created two in-depth tutorials, written for a beginner for whichever topic you might have meant.
How to create a start screen
How to create a start screen
1. Scene setup
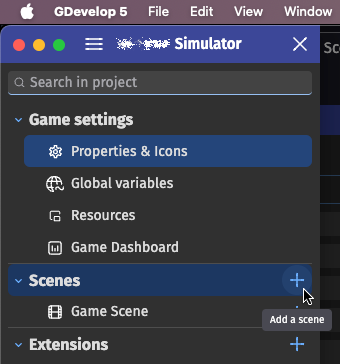
Open the Project Manager (the three lines on the top left) and under “Scenes” press the plus icon.
Some information has been redacted for privacy
Name the scene something like “Start screen” or “Title screen”, but you can name it whatever you like.
Right click on the scene you just created in the list, and press “Set as start scene”. A little flag will appear on the scene, meaning each time the game is started, it will begin on that scene, the title screen.
2. Object setup
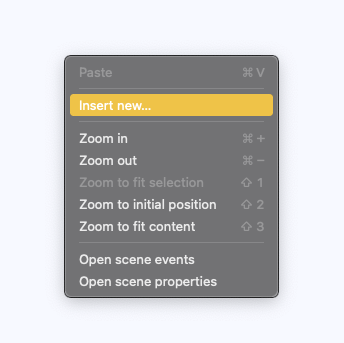
Click on the scene, and it will open two tabs in the background: A scene editor to edit the objects in the scene interactively, and the events (code) that will run within that scene. Click off of the Project Manager panel, you will be on the scene editor. You should see white, the default background color of scenes. Right click in that white space, and click “Insert new…”.
The “New Object” modal will appear. Lets try adding a logo, to do that, press “Sprite” at the top of the list. Name it something like “Logo” or “Title”. Where it says “Add your first animation”, you have two options. You can either create it right there in the built in drawing program, “Piskel”, or, you can import an image from your computer. The latter is suggested, as Piskel can be buggy, and is only intended for pixel art.
Once your image is added, press apply in the bottom right. The object should be added into the scene automatically. If you are unhappy with the size or position of the logo, hover over the object, and click it to select it. Handles will appear that allow you change the size and angle. To change the position, just drag the sprite itself, in the middle. If you drag one of those handles though, you may notice that it scales disproportionately to the original size of the object. To fix that, hold shift while dragging a scale handle, and it will scale according to the original aspect ratio. To center the logo, you have three approaches. You can eyeball it, center it programmatically, or use a grid.
Eyeballing
Just drag the sprite to what looks like the middle, within the outlined rectangle (which is the resolution of your game).
Programatic Centering
At the top of the screen, press “Title screen (Events)”, or whatever you named the scene.
Press add an event, and click add condition. Press the “Other conditions” tab, press “Scene” which is under “General”, then select “At the beginning of the scene”. Double click it or select it and press “Ok” to confirm.
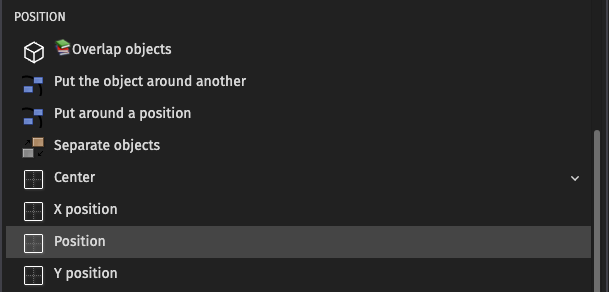
For the action, click add action, and select your logo object. Scroll down the list until you find “Position”.
Set the X and Y coordinates to these expressions accordingly:
X coordinate:
SceneWindowWidth() / 2 - (Logo.Width() / 2)
Y coordinate:
SceneWindowHeight() / 2 - (Logo.Height() / 2) - offset
Replace “offset” with the offset you want for the logo, as if its perfectly in the center, it will obstruct the buttons you need to put there.
Grid alignment
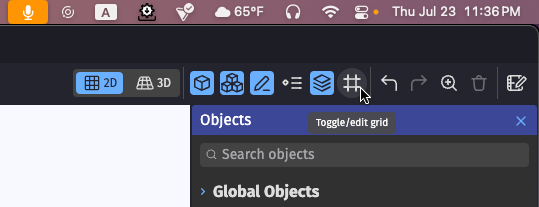
In the top right of the screen, press the “Toggle/edit grid” button, and press show grid. Then, do it again, and press “Setup grid”. Set the cell width to whatever you like, but i suggest for a game of 1280x720 resolution, these values:
Cell width: 32px
Cell height: 30px
This is because while 32 fits evenly into 1280, it does not into 720.
Follow the previous steps to align the object with the handles, expect this time, it will be snapped to the grid.
Adding Buttons
To add buttons, repeat the steps we did to create a logo, however, scroll down and select “Labeled button” instead.
Select a button that looks appealing to you. You can create your own appearance too, but I won’t be getting into that in this explanation. Once pressing an option, the button will be added into your scene. Double click on the button to open its properties, and change the content of the button label to be for example, “Play”, or “Start”. You can use any of the above methods to center the buttons as well.
Read the “Programatic Centering” section to get a basic understanding of how the events system works before programming the button.
Create a new event, and press add condition.
Select your button object, and scroll down in the list until you find the “Is clicked” condition.
For the action, press the “Other actions” tab, press “Scene”, and select “Change the scene”.
Make the parameter “Name of the new scene” the name of the scene where your actual game is, which might be named “Game Scene” or “Untitled Scene”.
Congrats, you just made a title screen from scratch!
How to create a loading screen
How to create a loading screen
To create a loading screen, there is two options. The real loading screen, and the “fake”, waiting screen.
The difference is that real loading screens are handled by the engine, and during them it loads the assets of the game. Normally though, that just happens right at the beginning of the game. In other games, like PC or console games, you see the title screen then the loading screen. However, not all of the time is it loading assets. Sometimes you might need a loading screen for code youre running in the background yourself.
Real loading screen
Open the Project Manager (the three lines on the top left) and press “Properties & Icons”. Upon opening that modal, press the “Branding and Loading screen” tab. There, you will find all sorts of options that let you alter the appearance of the loading screen.
Fake loading screen
Open the Project Manager (the three lines on the top left) and under “Scenes” press the plus icon.
Some information has been redacted for privacy
Name the scene something like “Loading”.
Now, all loading screens differ in design, but most have a loading bar. Create a new Resource bar object, pick a design you like, set its initial value to zero, and place it in the scene. Then, you can programmatically change the value of the resource bar randomly. I recommend installing the “Repeat every X seconds” extension for this.
I suggest copying this code.